How to deliver presentations remotely
A complete guide on how to deliver great presentations remotely using videoconferencing software.

A complete guide on how to deliver great presentations remotely using videoconferencing software.
What you need to deliver great presentations remotely: gear, software, setup, animation. We wrote this guide based on ten years of experience delivering professional remote presentations to clients. Note: we don’t earn any money on the software or hardware we recommend in this article. We recommend them based on our experience, but there are many other solutions that might work well.
Having a good setup is going to make the remote presentation experience much more enjoyable for your audience. While getting the best possible equipment costs thousands of dollars/euros, we think it’s overkill for most people. There are three key elements you need to pay attention to: ease of access, reliability of the conference and clear audio. In addition, having good video quality is going to look more professional, but you definitely don’t need a high-end cam to achieve good results. Here is a setup that works on Mac and Windows PCs and should deliver a completely satisfactory experience to your viewers:
Do you really want to shine and give the best impression during your videoconference? Then it’s time to step up! Each element of the following list will definitely improve the overall quality of your remote presentation.
The next step up is getting a digital mixing console, the appropriate gear to connect to it, soundproof your room, add professional lighting and use a DSLR to capture video. But it’s really overkill for 99% of use cases, and if you are not comfortable operating such equipment during a live presentation it may make things worse, not better.
Not being able to access the videoconference because of technical problems is the number one reason why people don’t like videoconferences. Nothing more frustrating than being blocked at the door because of a technical problem. While not foolproof, Zoom is the solution we’ve had more success with, and in our experience has a lower connection failure rate compared to Skype. Why? Because it’s easy to use and guides the user by the hand. Simply clicking on a link gives direct access to the meeting room, and if the software is not installed it offers you to download and install it (with your consent).
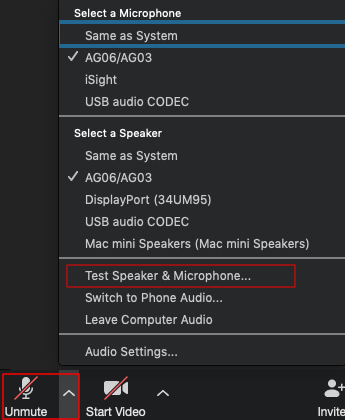
Pro tip: ask your participants to test their audio and video before the meeting. Non-working audio and video are the number one reason why most videoconferences don’t start on time. To do so in Zoom, go to the microphone icon at the bottom left, click on the up arrow next to it, and select “test speaker and microphone.”
If people know each other, you can get down to business quickly. Otherwise, make sure that people are ready to start and won’t interrupt the session. There’s nothing more annoying for participants than having to redo the intro several times because of late participants or people interrupting because they have a technical problem.
Any presentation software can be used. We’re going to use PowerPoint because it remains the industry standard.
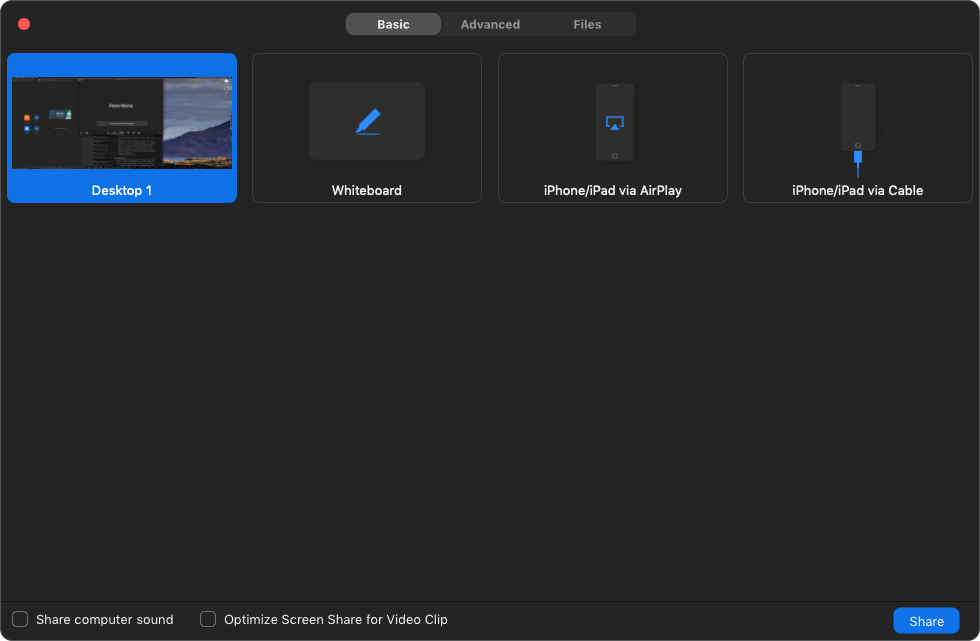
Start by Sharing your screen in Zoom. The easiest option is to simply share the whole screen. To do so, click on the “Share Screen” button at the bottom of the Zoom window, then select “Desktop 1” or whatever the name is for the whole screen view.
Next, start the Slide Show in PowerPoint, so participants can see your slides full screen (you may need to click on your presentation again to put the focus on PowerPoint). If you want to use PowerPoint’s presenter view and see your notes, you will need two screens, for example a laptop connected to an external monitor or television.
You can then start to deliver your presentations in the best conditions possible. Use the left and right arrows to move from one slide to another.
With Zoom and PowerPoint, you actually do not have one, but two different options to do live annotations to your slides.
From PowerPoint: move the mouse to the bottom left corner. A series of icons will show up. Clicking on the pen icon will show a pop-up menu with various options to highlight specific parts of your slide.

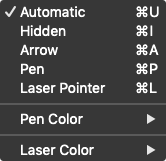
From Zoom: in the Zoom floating tools palette, click the “Annotate” pen icon. A second floating palette, the annotation palette, will appear right under the main one, giving you options to annotate part of the screen.


Should you use the PowerPoint or Zoom annotation tools? Here are the key differences between the two:
If presentations during face-to-face meetings can be boring, bad remote presentations can be insanely boring. Because we have no direct communication with the audience, because we lack the physical presence, because our brain must process the additional workload of using the videoconferencing software properly, it’s easy to sound like a robot reading a bunch of slides. Here is our advice to continue to sound engaging in a remote setting:
The most important thing is to keep a natural and energetic tone of voice. Keeping a conversational tone, your tone, is key to delivering a pleasing and engaging presentation online.
Pro Tip: my setup allows me to listen to my own voice when presenting. The sound of my microphone is fed back into my headphones. A lot of people hate to hear their own voice, but listening to yourself is the only way to be sure of how you sound for your audience.
It’s harder to detect clues in a virtual conference if participants need a break or want you to slow down. To avoid losing them, don’t speak for too long without interruptions. Include frequent exchanges between participants.
Don’t forget to put yourself in the participant’s shoes. Add variety to avoid monotony. Divide the presentation in smaller sections. Vary the rhythm and style of each section. What he will see is a video, close to what he would see on television or YouTube. You never see slides full of bullets on either of these media for a good reason: it’s ineffective and boring. Design your presentation so that it looks like a good video with your narration on top. Television avoids small text because it can be hard to read on small screens; we don’t recommend to attend a webinar from a smartphone because of the small screen size, but keep in mind that some tablets can have screens as small as 7 inches, so it’s best to use a large font for the text.
We can train your employees deliver great presentations remotely, and we can do it … remotely! We can also help you set up webinars to communicate your message to all your employees across multiple countries.
One of the advantages of Zoom is that you can record your session. After you finish your session, you can simply give a link to people who were absent so they can watch your presentation. It’s a great way to increase its impact on your organization without having to give it multiple times.
If you want an edited version of your remote presentation, with a corporate intro and outro, cutting out the unnecessary pauses and hesitations and highlighting the key messages, we can do that for you.